Setting up junk filtering
[This document is based on V5.1]
[Note examples use mycompany.com as the domain, please replace with your own domain name and not just copy the examples!]
In order to achieve the best possible filtering of junk, viruses and spam, from mail, FTGate has a layered approach to the problem of identifying junk messages.
Layer 1 – SMTP
SMTP is the way that mail should be moved around the internet (its how you mail client sends mail to FTGate and how FTGate sends mail to the internet).
When mail arrives using SMTP there are various pieces of information available to FTGate for it to determine whether the message is from a real sender or is likely to be from a source of junk:
-
IP address:
Are they a known spammer (RBL list)
Do they have a correct retry policy or are they a trojan infected machine (greylisting)
Do they have a valid reverse pointer (PTR) all real servers should have this. -
Hostname (HELO):
Did they sign on using a valid host name which is correct for their IP address -
Senders address:
Is the IP address listed as a valid address for the domain (SPF Lists) -
Header data:
Is the header valid
These tests usually give a very definite indicator of junk. While it is simple for a real sender to set these items to be correct, senders of junk mail and trojans find it very hard to get these things correct, and in the case of SPF, if the records are configured correctly it is not possible for a fake the authenticity of messages being sent.
Layer 2 – Text based filtering
The layer one filtering can eliminate 99% of all junk mail. The remaining mail can be filtered fairly simply using the remaining filter options. At this stage the message has been received and it looks like its a valid message in that there is nothing suspect about the sender, so we now have to perform analysis of the text.
FTGate performs several levels of text analysis on the messages:
-
UBEBlock+
Message URL’s – does the message link to any known junk sites
Is the header suspect
Does the message have any known pattern that looks like junk -
Stock Filter
Does the message match a standard stock option advert -
Content Analysis
Does the message violate any rules that may indicate it is junk
Layer 2 based filtering is never as effective as layer one because it is not difficult to create a junk mail message that looks like a real message to a computer program. Valid mailing lists that users often want to read look very like junk. If it were sent to a user other than the intended recipient it would be classed as junk. Thus filtering at this level will always be less effective than filtering at level 1.
Note: Layer 2 filtering can remove all the junk. However, the more effective it becomes at removing junk, the higher the chance that a valid message will get blocked.
Mail delivery
Many users when they start using the filtering are surprised when we ask whether they collect their mail using SmartPop or have it delivered using SMTP. You can see from the above two layers that it is an important question. If you have your mail sent directly to your server from the internet, then the chances of correctly identifying and blocking junk are very high. However, if you collect you mail using SmartPop from a POP3 mailbox at your ISP you have effectively given the Layer 1 filtering to your ISP, if they do not perform any filtering then you just have to do the best you can at layer 2.
Setting it up
So you have just set up your server and want to eliminate the junk. What do you have to do?
Level 1
If you get your mail delivered using SMTP directly from the Internet then you need to go to the Global Security Policy so you can set the SMTP filtering. Go to Services/Global Security Policy/Addresses and in the WAN range set the HDR, SPF, HE, PTR, GL and RBL flags. Then go to the Configuration/DNS page and make sure you have a valid DNS server (see DNS Servers). Then on the Configuration/RBL page make sure you enter at least one RBL site (see RBL Sites).
Your now set for level one filtering. That’s 99% of the junk blocked.
Level 2
This is where it gets a little more complicated as the content analysis part of the filter needs to know what good and bad messages look like for your domain. To do this we go through a process of training and then we monitor the results making changes as we go.
Accessing the training folders
To get the best results and make life easier for yourself as an administrator you should at this stage connect your mail client ot FTGate using the IMAP protocol. This is configured in your email client in the same way as POP3 only you select IMAP rather than POP3 as the client.
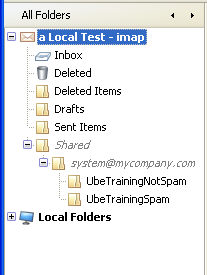
When connected to FTGate using IMAP you will find that the mail client shows you a list of the folders available in your mailbox and possibly some shared mailboxes from other mailboxes. The shared mailboxes are shown under a folder shared.
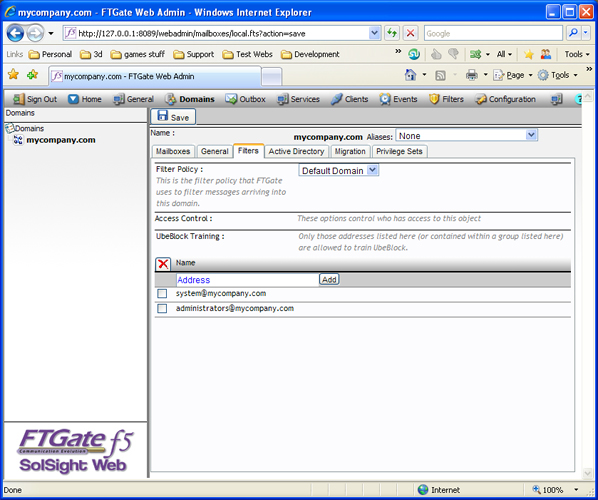
To gain access to the FTGate folders used for setting up the junk filters and performing filtering you should go to the local domain setting for your domain in WebAdmin (Domains/MyCompany.com) and click the Filters tab. You will then see options for selecting a filter policy (more on that later) and the mailboxes that can perform training.
By default the filter policy should be “Default Domain” and the training should list “system@mycompany.com” and “administrators@mycomany.com”. This means that the system mailbox can access the training folders and anyone in the administrators group can access them. If these options are not set, then set them.
Now if you go into your mail client IMAP folder or SolSight Web you will see that the new folders are available.
It is now possible to access the training folders.
First time training
To give FTGate an idea of what messages are treated as good in your network it helps to perform an initial training set by taking a selection of 30 typical messages that are not junk and using your mail client to drag and drop them onto the “UbeTrainingNotSpam” folder. The messages will sit in the folder for a while and then will be deleted as FTGate processes them.
Setting the filter options
In WebAdmin, click on Filters/Default domain. You can now see the options that provide the level 2 filtering.
Now we want to filter the mail, but we probably don’t want to filter mail from users in our address books. We also want to use UBEBlock+ as it is very good at filtering advertising junk. Click Options and set the Filter Control to Do not filter messages from authenticated and whitelisted addresses, and check the UBEBlock+ option. Then click the UbeBlock tab and set the UbeBlock option to “Generate UbeBlock rating and apply UbeBlock rating adjustments”.
Now we want to include our address books in the Whitelist. Click Whitelist and check the “Include addressbooks”.
Now click the ![]() button.
button.
Setting the rules
In order to actually filter the messages and allow control over what happens to a message the filtering is actually performed by a set of configurable filter rules. Click Filter Rules to see the default.
The default rules are set to allow messages through that should be let through, delete those that are from blacklisted senders (senders who we can identify as being bad), and tag the rest.
We can ignore those that let the mail though by default as you most likely will never need to change them. What you are most likely to want to change are those being tagged.
The process of tagging causes the subject of the mail to be altered with a text tag, so that when the message arrives in the users mailbox they can see that it has been tagged and thus identified as being suspect. As an administrator you may want to change this behaviour so that users don’t see suspect messages unless they have been approved.
Setting a special recipient
In order to make life easier for the administrator FTGate has the option of delivering all suspect mail to a specified mailbox where it can be reviewed. This mailbox may be the administrators own mailbox, or preferably it can be a different mailbox. Lets set this up.
First we need to create the junk handling mailbox. Go to Domains/MyCompany.com/Mailboxes and create a new user mailbox “junk”. Now open, in WebAdmin, the junk mailbox and go to the folders page. Click the share button next to Inbox, and set the Read/Write/Create and Delete options for the “Administrators” mailbox. Then click Update, then close the window.
Now if you go back to your mail client and check the folders you will see that the new junk mailbox has its inbox shared with your mailbox.
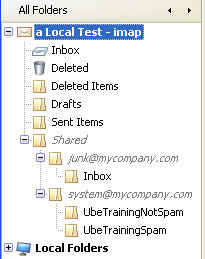
So you can now read anything in the junk mailbox and, if training is required, you can copy the messages from the junk inbox to the training folders.
Note: If its in the junk folder and it is junk, dont copy it to the UbeTraining Spam folder.
Sending the junk to the junk user
So now we want to send the suspect mail to the junk mailbox. Go back to the WebAdmin/Filters/Default domain/Filter rules page.
Select the rule that you want to redirect to the junk user and click the rule name to open up the rule properties. Click the action tab and from the action drop down box select SR, then enter the email address of the junk mailbox junk@mydomain.com into the Special recipient box.

Save the changes and repeat for any other rules you want to send to the special recipient.
We are now all set up for handling the junk. If you wish to add more administrators for junk handling you can simply add them to the administrators group and they will have access to training and the junk folder.
False positives
The number of false positives you get will be dependent on how harsh and how well trained your system is. See UBEBlock Training and UBEBlock Training Notes. Generally it is better to train false positives than false negatives.
When you have a false positive you need to be able to get it to the original recipient as quickly as possible. Unfortunately most mail clients don’t have a facility for redirecting mail without altering it as a forward. Some allow forwarding as an attachment, which the correct recipient can then open and reply. SolSight Web has the ability to redirect messages without altering the message. This is the best way to redirect incorrectly trapped mail. SolSight Web can also be used to train the system in the same way as IMAP and offers the same views as IMAP.
Reducing the number of false positives can be achieved through the correct training of the system (don’t let you general users train junk unless they know what they are doing (see UbeBlock Training Notes).